![]()
Adding a Blog
Note: To be able to create a blog, you must have permission to Add Folders on the blog’s Advanced Permissions screen. See Also: Permissions and Approvals
To add a blog, follow these steps.
1. From the Ektron CMS400.NETWorkarea,choose Content.
2. Click the folder in which the blog will reside.
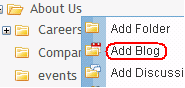
3. Choose New > Blog.
Alternatively, you can hover the cursor over any content folder, right click the mouse, and select Add Blog.
4. The Add a Blog screen appears.
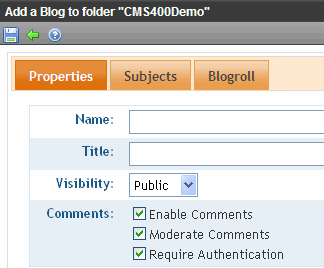
5. Complete the Properties tab according to the table below.
|
Field |
Description |
|
|
Name |
The name of your blog as it appears in the content folder tree. |
|
|
Title |
The title of your blog as it appears on the Web site. |
|
|
Choose whether the blog is private or public. |
||
|
Public |
Any site visitor can view the blog. |
|
|
Private |
Membership and Ektron CMS400.NET users must log in to view the blog. |
|
|
Comments |
Choose how to handle comments by checking the appropriate boxes. For more information, see Controlling Blog Comments. |
|
6. On the Taxonomy tab, select taxonomy categories to apply to the blog. See Also: Taxonomy
7. On the Templates tab, select templates to apply to the blog. See Also: Inheritance of Folder Templates
8. On the Subjects tab, add subjects to the blog. See Also: Blog Subjects
9. On the Blog Roll tab, add blog sites that you want blog readers to visit. See Also: The Blog Roll
Note: Editing a Blog’s Properties vs. Adding a Blog describes additional properties only available when editing a blog’s properties.


![]()